Today's Topic: AWS EC2 Instance
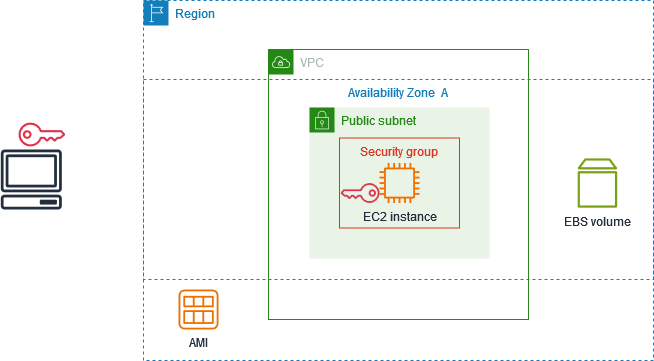
Today, I learned about the fundamentals of AWS EC2 instances, which are essential virtual servers in Amazon's cloud. EC2 provides scalable computing capacity, allowing you to run applications, host websites, and perform various computing tasks with flexibility and control. Here's a detailed guide on what I learned about launching and managing an EC2 instance.
What is an EC2 Instance?
An EC2 instance is essentially a virtual machine running on Amazon's cloud infrastructure. It allows users to rent virtual servers to run applications, deploy websites, or handle data processing tasks. You can choose from various instance types based on your computing needs, ranging from general-purpose instances to specialized ones optimized for compute, memory, or storage.
Launching Your First EC2 Instance
Sign In to the AWS Management Console: The first step is to sign in to your AWS Management Console. Once logged in, navigate to the EC2 Dashboard, where you'll find options to launch and manage instances.
Choose an Amazon Machine Image (AMI): An AMI is a pre-configured template that contains the operating system and application server required to launch your instance. AWS offers a variety of AMIs, including Amazon Linux 2, Ubuntu, and Windows Server. Select the AMI that suits your use case.
Select an Instance Type: Choose an instance type based on the workload you plan to run. Instance types vary in CPU, memory, storage, and network performance. If you're just getting started, the
t2.microort3.microinstance type is ideal as it falls under the AWS Free Tier, allowing you to run it at no cost for up to 750 hours per month.Configure Instance Details: Here, you can customize your instance by configuring the number of instances, network settings, and purchasing options. You can also enable auto-scaling to automatically adjust the number of instances based on demand.
Add Storage: Select the size and type of storage you want to attach to your instance. By default, the AMI you choose will come with a root volume, but you can add more storage or change the type (e.g., SSD or HDD) based on your needs.
Add Tags: Tags are key-value pairs that help you organize and manage your instances. For example, you can add a tag with the key
Environmentand the valueDevelopmentto identify the instance's role.Configure Security Groups: Security groups act as virtual firewalls, controlling inbound and outbound traffic to your instance. By default, all inbound traffic is blocked. To allow access, you need to add rules to permit traffic on specific ports (e.g., SSH access on port 22).
Review and Launch: After configuring your instance, review the settings. If everything looks good, click "Launch." You'll be prompted to create a new key pair or use an existing one. This key pair is essential for securely connecting to your instance via SSH.
Connect to Your Instance: Once your instance is up and running, you can connect to it using an SSH client. On Linux or Mac, the SSH command looks like this:
ssh -i /path/to/your-key.pem ec2-user@your-instance-public-ipReplace
/path/to/your-key.pemwith the path to your key pair file andyour-instance-public-ipwith the public IP address of your instance.
Managing and Securing Your EC2 Instance
After launching your EC2 instance, it's essential to manage and secure it properly to ensure optimal performance and security.
Update Your Instance: The first task after connecting to your instance is to update the operating system packages. For Amazon Linux, use the following command:
sudo yum update -yFor Ubuntu, use:
sudo apt-get update && sudo apt-get upgrade -yInstall Necessary Software: Depending on your use case, you may need to install additional software like a web server (e.g., Apache or Nginx), a database, or other application servers.
Set Up Monitoring: AWS offers CloudWatch, a monitoring service that allows you to collect and track metrics, monitor log files, and set alarms. Enabling CloudWatch will help you monitor the performance of your instance and ensure it operates within desired parameters.
Secure Your Instance: Beyond configuring security groups, you should consider additional security measures, such as disabling root access, setting up a firewall, and using tools like fail2ban to protect against unauthorized access attempts.
Back Up Your Instance: Regularly back up your instance by taking snapshots of your EBS volumes. These snapshots can be used to restore your instance in case of failure or to create new instances with the same configuration.
Conclusion
Launching and managing an EC2 instance is a critical skill for anyone working with AWS. Whether you're running a simple web server or a complex application, EC2 provides the scalability, flexibility, and control needed to meet your computing needs. By following the steps outlined in this guide, you can confidently launch, manage, and secure your EC2 instances.
Remember, AWS EC2 is a powerful tool, and mastering it opens up many possibilities in cloud computing and beyond.
Feel free to share your thoughts and questions in the comments below, and don't forget to follow me for more AWS insights and tutorials!
#AWS #CloudComputing #DevOps #EC2 #CloudInfrastructure #AWSBeginner
4o


